Check spelling in OneNote for Mac
Applies To
OneNote for Microsoft 365 for Mac OneNote 2024 for Mac OneNote 2021 for MacMicrosoft OneNote for Mac helps you detect and fix spelling errors as you type. This can save you time and effort while keeping your notes error-free.
Check spelling and grammar as you type
When you type, OneNote automatically checks for potential spelling errors, and underlines the words you should check with a squiggly red line.

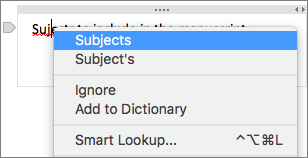
To check a misspelling, control-click the underlined word, and choose the appropriate option.

You can do one of the following:
-
If available, click one of the suggestions to substitute the misspelled word.
-
Click Ignore, to reject the error detection.
-
Click Add to Dictionary, to make sure that OneNote doesn’t detect the word as an error in the future.
-
Click Smart Lookup, to do a quick Bing search on the word.
Check spelling on an entire page
To check spelling on an entire page, do the following:
-
Click Tools > Spelling.
-
In the Spelling pane on the right, do any of the following:
-
Click Ignore to skip the currently selected text and move on to the next item.
-
Click Add to add the currently selected text to the dictionary so that OneNote doesn’t detect the word as an error in the future.
-
Select a replacement word in the list, and then at the bottom of the pane, click Change.
-
Turn automatic spelling check on or off
-
On the menu bar, click OneNote > Preferences.
-
In the OneNote Preferences dialog box, click Spelling.
-
Under Spelling and AutoCorrect, check or clear the Check spelling as you type check box.
Turn automatic capitalization on or off
-
On the menu bar, click OneNote > Preferences.
-
In the OneNote Preferences dialog box, click Spelling.
-
Under Spelling and AutoCorrect, check or clear the Capitalize the first letter of sentences check box.
Turn periods with double-space on or off
You can set OneNote to add a period after a word or sentence by tapping the space bar twice.
-
On the Apple menu, click System Preferences.
-
In System Preferences window, click keyboard.
-
Click the Text tab.
-
Check or clear the Add period with double-space check box.
Check the spelling of your notes in a different language
You can change the proofing language for text on a page.
Note: You cannot change the proofing language for an entire notebook. Nor can you set the default proofing language for all future sessions with OneNote.
-
On the menu bar, click Tools > Set Proofing Language.
-
In the Language list, select the language you want OneNote to use during an spelling check.
-
Click OK.
-
After the spell checking is complete, the spelling language will revert back to the original language.


