Not all the design-related features in the Visio desktop app are supported yet in Visio for the web. This article discusses some of the differences between the two. An article that can help you understand these differences more generally is Why can’t I open a diagram for editing in Visio for the web?
Themes and variants
Themes are applied to an entire diagram to give it a makeover and make it stand out. Visio provides a large set of themes and styles. They are professionally designed to give your diagram a variety of dynamic looks, ranging from professional and modern to stylish and hand drawn. By combining colors, fonts, and effects in a unified and purposeful manner, each theme gives your diagram a distinctive, vibrant, and cohesive visual.
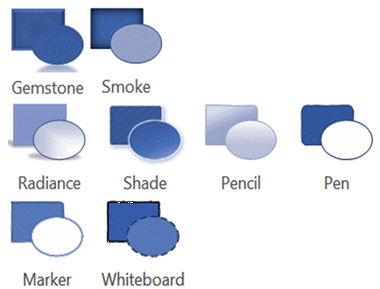
However, Visio for the web doesn’t support some themes that the Visio desktop app supports. If a drawing has a theme applied to it that Visio for the web doesn’t support, then the drawing file can’t be opened in Visio for the web. The following themes are not supported in Visio for the web:
|
Theme category |
Unsupported themes |
|---|---|
|
Professional |
None. All themes are supported. |
|
Modern |
 |
|
Trendy |
|
|
Hand drawn |
|
Changing a theme
If an existing diagram has one of the above themes applied to it, but you want to be able to open it in Visio for the web, you must first change the theme in the Visio desktop app. To do so, follow these steps:
-
To apply a theme, go to the Design tab and choose from any of the theme options available by just clicking on the theme to be selected. Choose any theme not mentioned in the above list to open the diagram for editing in Visio for the web.
-
By hovering your mouse over any of the selections, you can preview that theme on your diagram. You can quickly experiment with various looks without committing to the change. Once you find the perfect theme for you, you can opt to customize your diagram further with variants and styles.

Variants
If a theme is not supported in Visio for the web, its variants are also not supported. To be able to open a file for editing in Visio for the web, choose from any of supported themes and then apply a supported variant to the supported theme.
The following variant effects are not supported in Visio for the web irrespective of whether the theme is supported.
|
Variants |
|
|---|---|
|
Unsupported variants: |
 |
Changing a variant
If an existing diagram has one of the above variants applied to it, but you want to be able to open it in Visio for the web, you must first change the variant in the Visio desktop app. To do so, follow these steps:
-
To apply a variant, go to the Design tab and choose from any of the variant options available by just clicking on the theme to be selected. Choose any variant not mentioned in the above list to open the diagram for editing in Visio for the web.
-
By hovering your mouse over any of the selections, you can preview that variant on your diagram. You can quickly experiment with various looks without committing to the change. Once you find the right variant for you, you can opt to customize your diagram further with styles.

Quick styles
Each new theme offers a set of quick styles, which are style and color pairings that can be applied to individual shapes. Because quick styles leverage the color scheme and style sets of your chosen theme and variant, you can apply them liberally to shapes while retaining an overall unified look.
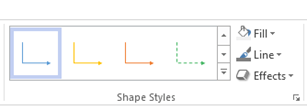
You can apply styles through the Shape Styles Gallery in the Home tab. Simply select the shape(s) that you want to format, and then select a style from the gallery. You can view the entire gallery by clicking the down-arrow to the right of the gallery. You can hover over any of the selections to see a preview in your diagram.

Styles support all shape types in Visio. In addition to two-dimensional shapes, Visio also offers Quick Styles for connectors and lines:

Layers
Layers with the lock, color, or transparency property are not supported in Visio for the web. If an existing diagram has layers with these properties in it, but you want to be able to open it in Visio for the web, you must first remove them in the Visio desktop app. To do so:
-
In the Home tab, in the Editing group, click Layers, and select Layer Properties.
-
In the Layer Properties dialog box, check to see if any shapes are assigned to the layer.
-
If a layer has shapes on it, do the following to assign the shapes to a different layer:
-
To close the Layer Properties dialog box, click OK.
-
Select the shapes you want to reassign.
-
On the Home tab, in the Editing group, click Layers, and select Assign to Layer.
-
In the Layer dialog box, click the layer you want to assign the shapes to.
-
Click OK.
-
-
In the Editing group, click Layers, and then select Layer Properties again.
-
In the Layer Properties dialog box, select the layer you want to delete, and then click Remove.
Tip: To delete all unused layers, in the Layer Properties dialog box, check Remove unreferenced layers, and then click OK.
To learn more about layers, please see Add a layer.
See Also
Fill a shape with a color, gradient, or pattern


