By default in Windows, Microsoft Defender Antivirus runs in the background, scanning files and processes that you open or download looking for malware.
There may be rare instances when you have a particular file or process that you don't want scanned in real-time. When that occurs you can add an exclusion for that file, file type, folder or process.
Caution: Excluding a file or process from antivirus scanning can make your device or data more vulnerable. Be certain you want to do this before you proceed.
One important thing to note - exclusions only apply to real-time scanning with Microsoft Defender Antivirus. Any third party antimalware products, or scheduled scans with Microsoft Defender Antivirus, may still scan these files or processes.
To add an exclusion
-
Go to Settings > Update and Security > Virus & threat protection.
-
Under Virus & threat protection settings select Manage settings.
-
Under Exclusions select Add or remove exclusions.
-
Select Add an exclusion
-
Choose one of the four options depending upon the type of exclusion you're trying to add:
-
File - Excludes a specific file
-
Folder - Excludes a specific folder (and all of the files within that folder)
-
File type - Excludes all files of a specified type, such as .DOCX, or .PDF.
-
Process - Excludes all files opened by a specified process. For example if you exclude the test.exe process, any files opened by the test.exe process will be excluded.
To remove an exclusion
-
Go to Settings > Update and Security > Virus & threat protection.
-
Under Virus & threat protection settings select Manage settings.
-
Under Exclusions select Add or remove exclusions.
-
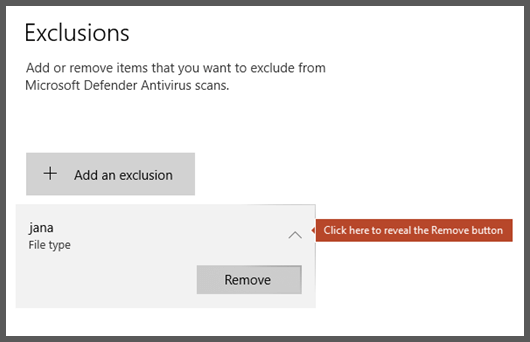
You'll see a list of current exclusions. Hover your mouse over the one you want to remove and click the drop-arrow towards the right side of it to reveal the Remove button.

-
Select Remove.
See also
Configure and validate exclusions for Microsoft Defender Antivirus scans


